Tying Fret Knots
When the frets wear thin or work loose it is best to put on new ones. Some people prefer nylon frets and some gut. The nylon last practically for ever but they do tend to cut through gut strings and, being more shiny, allow the individual strings in a course to slide apart irritatingly under the finger. They are also much stiffer than gut and do not conform to the edge of the fingerboard so well, often leaving very tiny gaps under them just inside the edge which have a terribly deadening effect on the tone of the string which is fretted at that point. If you notice one or two frets where this is the case, particularly on the top and bottom courses, and especially if you have nylon frets, check to see if this is the cause; and either tie the fret tighter, change to gut, or have the edge of the fingerboard sanded to a more rounded profile. Gut frets are much easier to tie, which is a good thing as they certainly wear out more quickly.
For single frets there is a bewildering array of different knots used by different players and makers. Here are a few:
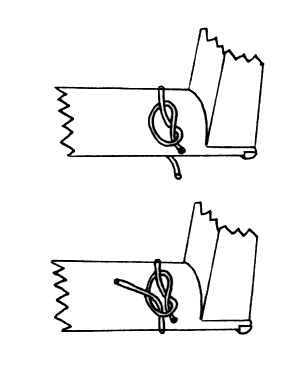
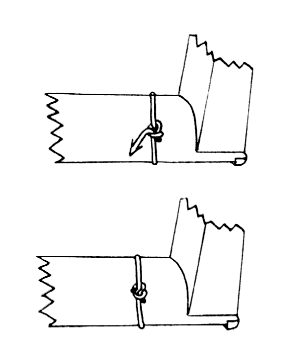
The simplest, and most economical of gut, is to:
- burn one end of the gut to swell it up,
- pass this end under all (!) the strings from treble side to bass side,
- make an ordinary thumb knot with the very end of this swollen end round the long part of the gut at the back of the neck on the bass side,
- pull the long end very tight,
- cut it off about 1.5mm from the knot with clippers, and then
- burn the stub to secure the end from pulling through.
Don't burn the varnish! A soldering iron is the safest way, but careful use of matches can be fine. Gas lighters are only for the very bold. This burning is not just for the comfort of the player, it swells out the gut (or nylon) and helps to lock the knot securely.
This is the well known parcel slip knot and if in doubt you could ask your friendly local postman.
The second knot is to pass the short end as before under all the strings from treble to bass side and then use a figure-of-eight knot round the long end, pull tight and then put a half hitch with the long end round the stub of the short end, cut off both and burn. This is very secure but a bit large and clumsy.
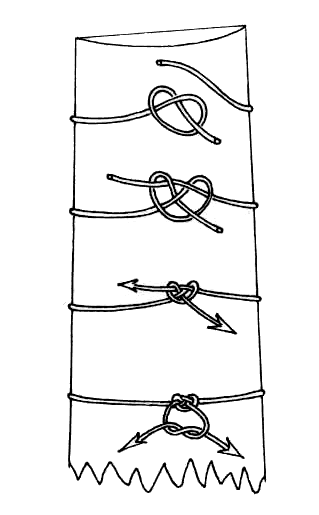
A third knot is to use a clove hitch as the knot followed by the half hitch locking, burning etc. Also very secure but large.
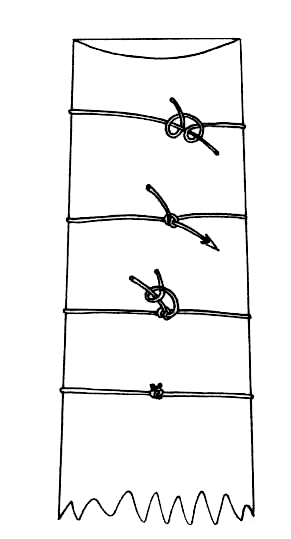
Although Thomas Mace recommends single frets he only gives instructions for tying double ones:
“The way to Tye on a Fret the best way, is Thus; viz. Your Lute standing (as it were) before you upon a Table, upon Its Back, take your Fret, and put It double, under all the Strings, beginning from the Basses, towards the Trebles; then (putting your Left Hand under the Neck) take That Middle Double, and draw it under the Neck towards the Basses, (holding fast the two Ends in your Right Hand) till you have brought them together, (viz. the Middle Nooze, and the Two Ends.)Then take that End next you, which you held in your Right Hand, and put it through That Nooze, so, that you make another Nooze of That End, and then let the first Nooze go.
Then again, take but the other End, which still remains in your Right Hand, unused, and put It through your last Nooze, taking the Ends, (in each hand one) and let All else go, and (only drawing them straight) your business of Tying is over.” [Musick's Monument 1676 pp.69-70].
Mace then recommends that you carefully push the frets up the neck to their correct position so as further to tighten them. But do be careful if your neck is varnished, because the knot can very easily make great grooves in the varnish and even the wood, especially if you have pulled the fret properly tight. Mace's instructions really do work, but in case you find them hard to follow, here is the same knot in visual form viewed from the back of the neck.
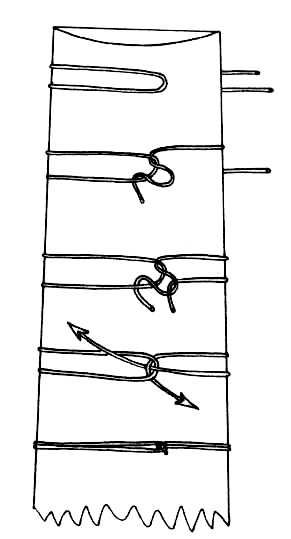
I am grateful to Jules Siegel for cleaning up these images from their original rather dirty backgrounds.