Build your own Baroque Lute!
LESSON 1
The Mould
It is worth taking some care to be accurate with the mould as everything else follows from it and a mishapen mould will be much harder to work from. It's a bit of a chore because MDF is not a very gratifying material to work with. But it's very straightforward and if you follow my instructions, a very accurate mould will result.
You will need some tracing paper and some 12mm or half inch thick MDF [medium density fibreboard, apparently also called beaverboard in the US] To be clear about this: it is a smooth faced board a bit like a thick hardboard but with both sides smooth, it behaves as if made out of extremely compressed paper. The dust from it is irritating and a mask should be worn while sanding or cutting it with a bandsaw. In fact ALL hardwood dust is now thought to be somewhat carcinogenic and you should take reasonable precautions when creating dust. If MDF is not available, particleboard or chipboard is perfectly satisfactory, it's just a bit grittier to work with and doesn't show the tracing so well.
You need 90cm x 60cm x 12mm.
If you are in USA you will probably find that 12mm is not available and you will have to use half inch thick stock, this is slightly thicker by about 0.7mm. I have included a revised set of mould plans for those of you in this predicament.
You also need a little PVA glue. This is the only time you'll need it! It's widely and cheaply available, it's usually white and looks like thin cream. If you're a perfectionist Titebond, a yellowish aliphatic resin glue, is the best, but any of these glues like Evostik Resin W will do.
Carefully trace the plan and profile views of the mould onto the tracing-paper just as they are shown in the plans, together with the sets of parallel lines which show where the X-sections are to go, and both lines which run along the bottom. The lower of these is the centre-line of the plan view and the other one is the lower edge of the profile or central spine of the mould. Use a soft [2B] pencil of about 5mm or 7mm thick, I use the automatic pencils of the kind produced by Pentel as the line width remains constant. It is worth lightly tacking the tracing-paper down to the plans with little bits of sellotape, so that it doesn't move.
Then turn the tracing-paper upside down onto the MDF and transfer just the centre-line, the plan view outline [this is the inner curved line] and the parallel cross lines. Do this by going over the lines firmly and carefully with a slightly harder pencil. say HB.
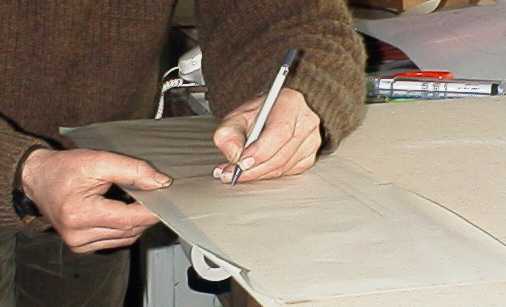
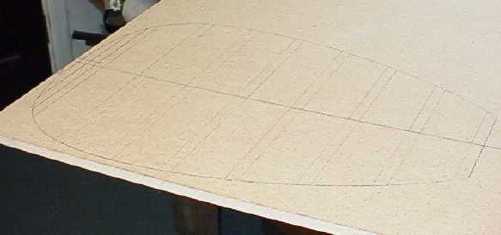
This may seem obvious, but don't transfer the lines by shading across the area like the brass-rubbing technique, or you will soon have a complete mess. Do it by retracing the exact lines. This will now mean that you also have pencil traces on the upper surface of the tracing-paper as well as the design on the MDF. So turn the paper over again and line it up so that the centre-line lies exactly over the centre-line you have just marked onto the MDF. Now trace the same three elements again: plan view, parallel cross lines and centre line [this is just to double check the alignment]. You should now have a completely symetrical outline of the front view of the lute marked on the MDF, with a centreline and a squared-off end where the neckblock will be. This is what it should look like at this point:
There is another transferring method which some people may prefer, especially those using particleboard with its rougher surface. This is to carefully prick through the paper along the lines and particularly at the corners, into the wood and then to join up the pinpricks with a pencil line. Make sure that the pencil line goes through the exact centre of the pinprick holes in the wood. Also be careful not to enlarge the holes in the paper with your repeated pinpricking. This transfer method is much used in the violin-making world following the example of Stradivari, but personally for this specific mould making function and using MDF, I prefer the pencil method.
Now cut this out. You could do all the tracing first but the pencil line transferred in this way is only loosely attached to the surface and handling easily rubs it off, so better cut out each piece before tracing the next onto the MDF. Use whatever is easiest to cut it out, I show a hand saw and a coping saw here.
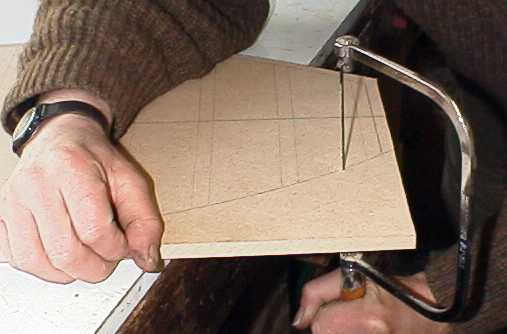
But personally I use a bandsaw and a scroll saw. If you do use a coping saw be very careful to keep the cut upright. Whatever saw you use, cut JUST outside the pencil line. If the line does show signs of disappearing, go over it again directly [not through the tracing-paper] with your pencil.
Then trim the shape down exactly to the line, either with a plane as shown.
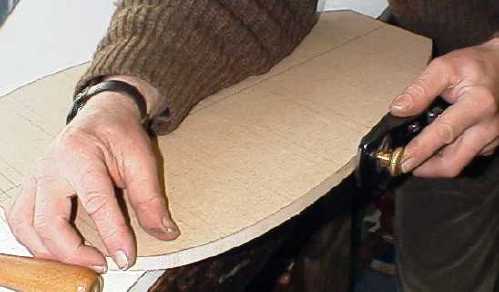
or use a sanding disc, which is certainly quicker. But whatever you use KEEP THOSE EDGES VERTICAL!
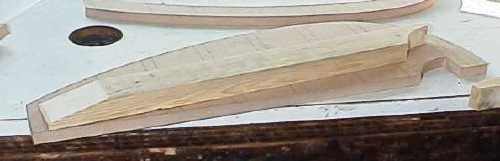
Now transfer the longitudinal profile [the outer curve, I'll call this the spine in future] onto the MDF using the same technique as before, together with the parallel cross lines and just the upper of the two bottom straight lines. [This line represents the top surface of the plan view piece you have just cut out].
Cut out and trim as before. Then place the two pieces together as shown here.
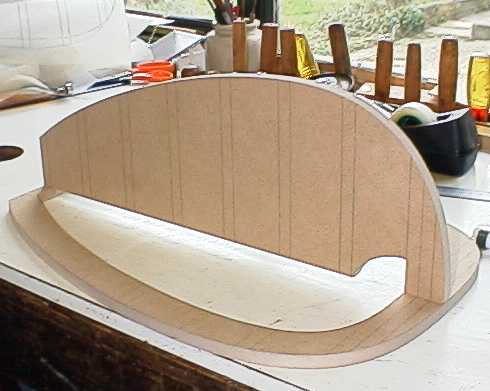
Check that the ends and the parallel lines in fact line up properly. Cut out the small quadrant piece from the spine [profile] as shown in the picture. This is to give access when building the lute, to the head of a G cramp to hold the ends of the ribs on the centreline.
Next, scribe a pencil line 36mm inside the outline of the plan view, as shown here:
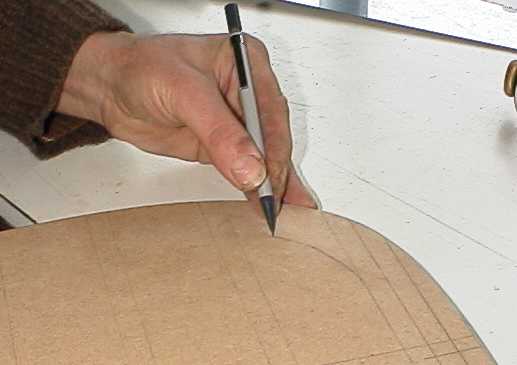
This doesn't have to be accurate, using fingers as a guide is fine. At the neck end this rim reduces to just the 12mm cross-section lines marked. And cut out the central section with the coping saw, having drilled a hole to put the blade through.
Put the spine and this plan view piece together again and they should look exactly like this:
Cut a couple of scrap bits of wood to stiffen and widen the bottom edge of the spine piece. The picture only shows one of these, do one each side.
Taper the neck ends as shown in the picture and cut out the quadrant shape to match the spine. Make sure these are exactly the right length to fit between the top cross-section and the bottom three cross-sections. Glue these in place on either side. I find drilling for a couple of screws while cramped together before applying the glue, helps stop the three bits from sliding about all over the place when the slippery glue is put on. Drill right through all three pieces with a small pilot drill and then enlarge the top two holes enough to push the screw through. That way the screw will actually cramp all three pieces together as well as locating them properly.
Copyright © David Van Edwards 1999-2003 All Rights Reserved